Quick Summary: 5-Step Tool-Free Disassembly SOP
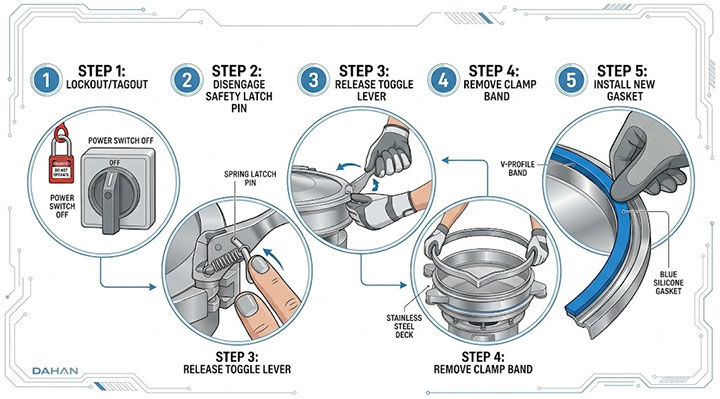
Quick-release clamps on sanitary food vibro sifters utilize an over-center toggle mechanism, enabling complete tool-free disassembly in under 3 minutes to reduce downtime during CIP washdowns and mesh replacement. The standard disassembly procedure is as follows:
-
Power & Air Lockout (LOTO): Shut off the vibratory motor power supply, execute safety Lockout/Tagout (LOTO) to ensure complete standstill, and disconnect all flexible inlet/outlet sleeves.
-
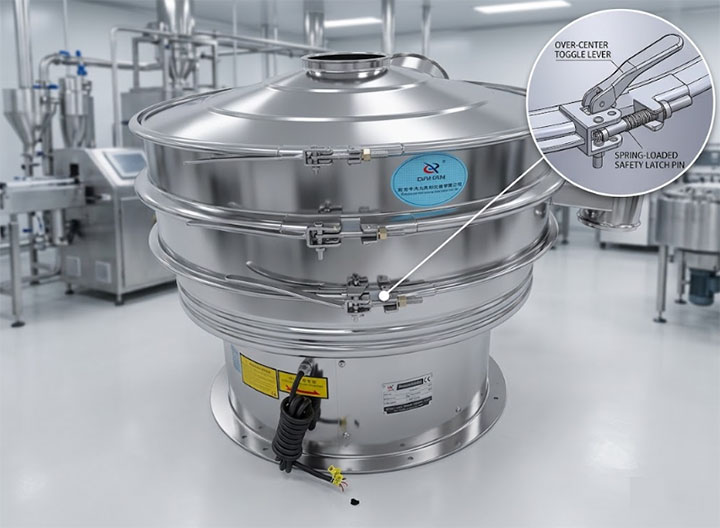
Unlock Anti-Vibration Safety Pin: Press or pull the spring-loaded safety pin on the toggle clamp handle (prevents accidental opening caused by high-frequency vibration).
-
Release Toggle Lever: Pull the clamp handle outward to release circumferential tension, then unhook the latch loop from the retaining catch.
-
Remove Clamp Band & Screen Decks: Slightly expand and remove the V-profile clamp band, then lift off the top cover and screen frame in sequence, placing them flat on a clean surface.
-
Inspect & Replace Gasket: Remove the old food-grade silicone seal and check for tears or aging. Wipe the flange groove clean, then press a fresh FDA-compliant gasket evenly into the channel.
Why Tool-Free Quick-Release Clamps for Food-Grade Vibro Sifters
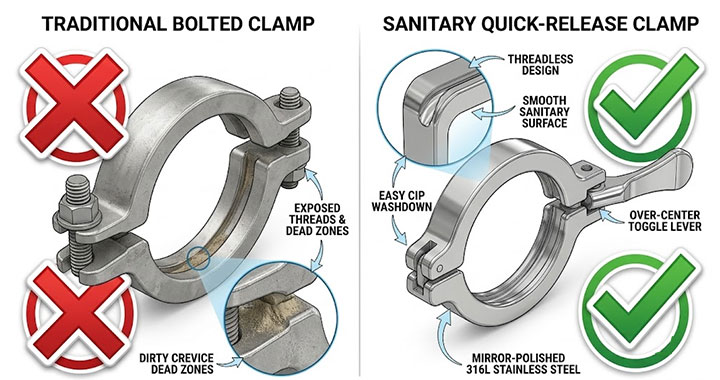
In food processing plants and cleanroom environments, the equipment disassembly method directly impacts product safety and operational efficiency. Compared to traditional bolted band clamps, tool-free quick-release clamps provide three engineering advantages:
Mitigates Tool Contamination & Foreign Body Risks : Avoids the reliance on wrenches or metal tools in sanitary production zones. This prevents tool drop hazards, surface scratching, and metal shaving contamination caused by thread friction.
Optimized Sanitary Design & Washability : Reduces the dead zones inherent to exposed threads on traditional bolts, which can trap moisture and food powder. Quick-release clamps feature a threadless, sanitary profile with smooth polished surfaces that facilitate thorough CIP flushing.
Reduces Downtime & Labor Costs (Higher Operational Efficiency): Food lines require frequent batch changeovers and sanitation checks. The tool-free clamp simplifies disassembly, maximizing production uptime and lowering operator workload compared to traditional bolted setups.
Step-by-Step SOP: How to Disassemble Quick-Release Clamps (Tool-Free)
Follow these 5 standardized steps for tool-free disassembly during batch changeovers, mesh inspections, or gasket replacements:
Step 1: Power & System Lockout (LOTO): Shut off the main power supply to the vibratory motor and execute Lockout/Tagout (LOTO) protocols to ensure complete machinery shutdown. Disconnect any flexible inlet/outlet sleeves or dust extraction ducts.
Step 2: Disengage the Safety Latch Pin: Locate the spring-loaded safety pin on the clamp handle (designed to prevent accidental loosening under high-frequency vibration). Press or pull the pin to release the primary lever lock.
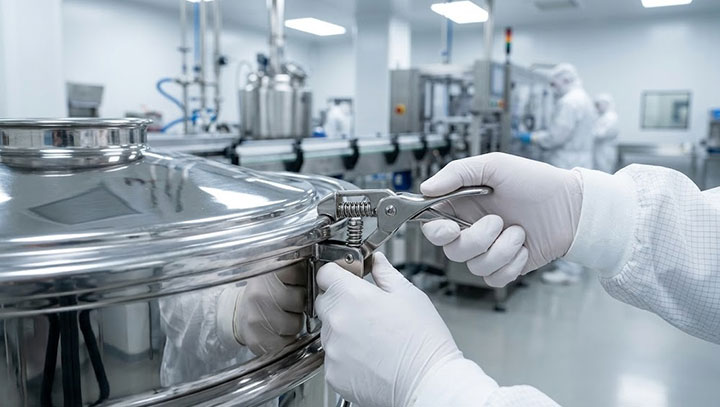
Step 3: Release the Toggle Lever Mechanism: Firmly grip the clamp handle and pull it outward to relieve the circumferential tension around the screen deck flanges. Unhook the latch loop from the retaining catch.
Step 4: Remove the Clamp Band & Screen Decks: Expand the V-profile clamp band slightly and lift it clear of the flanges. Carefully lift off the top cover and screen frame in sequence, placing them on a clean, padded surface to prevent flange sealing face damage.
Step 5: Inspect and Replace the Sanitary Gasket: Peel the existing silicone gasket from the flange seating channel. Inspect the seal for compression set, micro-tears, or product buildup. Clean the groove with an approved food-grade sanitizer, then press a fresh FDA-compliant gasket evenly into the channel without twisting.
Critical Inspection Checklist: What to Check After Disassembly
Once the quick-release clamps and screen decks are removed, conduct a quick inspection of these core components to ensure sealing integrity and operational safety for the next batch:
| Inspection Component | Common Failure Signs | Recommended Action |
|---|---|---|
| Sanitary Gasket | Micro-tears, permanent compression set, discoloration, or loss of elasticity | Replace immediately with an FDA-compliant gasket (metal-detectable silicone recommended). |
| V-Profile Clamp Interior | Product accumulation, surface scratches, or material buildup | Wipe clean with a non-abrasive cloth; check the V-groove profile for indentation or deformation. |
| Adjustment Eyebolt | Thread looseness, physical deformation, or improper clamping force | Recalibrate the handle closing tension via the adjustment eyebolt. |
| Deck Flange Sealing Faces | Denting, surface gouges, or hardened material buildup | Clean flange surfaces ; re-polish or replace the deck if severe denting causes leakage. |
Reassembly & Calibration: Preventing Leaks and Pinch Damage
Reassembling the quick-release clamp correctly is critical to avoiding powder leakage and extending gasket service life. Follow these engineering guidelines:
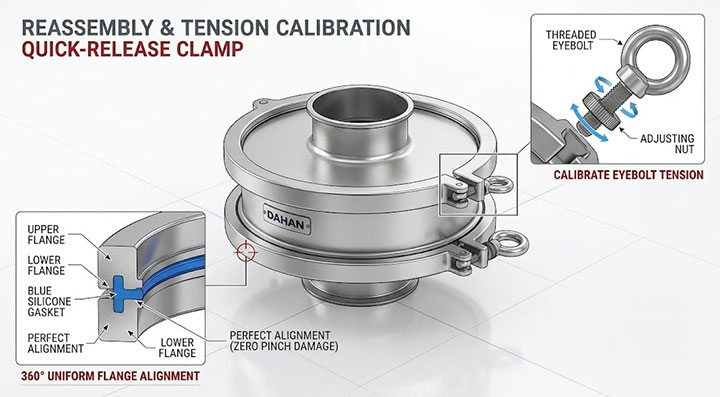
360-Degree Uniform Flange Alignment: Before closing the clamp, ensure the sanitary gasket sits fully flat in the groove and the upper/lower deck flanges are evenly aligned. Never force the clamp shut on tilted flanges to prevent gasket pinch damage.
Calibrate Clamp Tension via Eyebolt: If the toggle handle feels too loose (causing poor seal) or excessively tight, adjust the threaded eyebolt on the latch mechanism. Fine-tune until the handle closes smoothly under moderate hand pressure.
Engage the Anti-Vibration Safety Pin: Once the lever is locked into place, verify that the spring-loaded safety pin snaps fully into its locking slot to prevent accidental opening from high-frequency operation.
Never Apply External Force: Quick-release clamps are designed exclusively for hand operation. If the handle resists closure, stop immediately and inspect for misaligned gaskets or material buildup. Never hit the handle with a hammer or lever bar.
Frequently Asked Questions (FAQ)
How often should the sanitary silicone gasket be replaced?
Every 3–6 months. Replace immediately if you detect deformation, micro-tears, or discoloration to maintain FDA compliance.
Why does the quick-release handle vibrate open during operation?
This is caused by an unengaged safety pin or inadequate eyebolt tension. Re-calibrate clamping tension and ensure the safety pin snaps locked.
Are quick-release clamps suitable for CIP washdowns and wet screening?
Yes. Combined with 316L stainless steel and FDA-approved gaskets, they withstand standard CIP cleaning and wet processing.